Media Reference Stack Guide
Sysstacks containers have been deprecated and please switch to oneapi based containers, you can find oneapi containers at this link : https://hub.docker.com/u/intel The Media Reference Stack (MeRS) is a highly optimized software stack for Intel® Architecture Processors (the CPU) and Intel® Processor Graphics (the GPU) to enable media prioritized workloads, such as transcoding and analytics.
This guide explains how to use the pre-built MeRS container image, build your own MeRS container image, and use the reference stack.
Overview
Developers face challenges due to the complexity of software integration for media tasks that require investing time and engineering effort. For example:
Finding the balance between quality and performance.
Understanding available standard-compliant encoders.
Optimizing across the hardware-software stack for efficiency.
MeRS abstracts away the complexity of integrating multiple software components and specifically tunes them for Intel platforms. MeRS enables media and visual cloud developers to deliver experiences using a simple containerized solution.
Releases
Refer to the System Stacks for Linux* OS repository for information and download links for the different versions and offerings of the stack.
MeRS V0.4.0 release announcement including accelerated video analytics with Intel® Advanced Vector Extensions 512 (Intel® AVX-512), Intel® AVX-512 Vector Neural Network Instructions (AVX512 VNNI), and Intel® AVX-512 BFloat16 Instructions (AVX512_BF16) support. Intel® Xeon® Cascade Lake support. Intel(R) Graphics Compute Runtime for oneAPI Level Zero and OpenCL(TM) Driver to enable GPU Plugin on DLDT.
MeRS V0.3.0 release announcement including media processing on GPU/CPU, analytics on CPU, AV1 Intel® Media Driver for VAAPI HW decoder and Intel® Gen12 graphics devices support.
MeRS V0.2.0 release announcement including media processing on GPU and analytics on CPU.
MeRS V0.1.0 including media processing and analytics CPU.
MeRS Release notes on Github* for the latest release of Deep Learning Reference Stack
Prerequisites
MeRS can run on any host system that supports Docker*. This guide uses Ubuntu* OS as the host system.
To install Ubuntu OS on a host system, see how to install Ubuntu* OS desktop.
To install Docker* on a Ubuntu OS host system, see the instructions for installing Docker*.
Important
For optimal media analytics performance, a processor with Vector Neural Network Instructions (VNNI) should be used. VNNI is an extension of Intel® Advanced Vector Extensions 512 (Intel® AVX-512) and is available starting with the 2nd generation of Intel® Xeon® Scalable processors, providing AI inference acceleration.
Stack features
The MeRS provides a pre-built Docker image available on DockerHub, which includes instructions on building the image from source. MeRS is open-sourced to make sure developers have easy access to the source code and are able to customize it. MeRS is built using the latest Ubuntu LTS Docker image.
MeRS provides the following libraries and drivers:
SVT-HEVC* |
Scalable Video Technology for HEVC encoding, also known as H.265 |
SVT-AV1 |
Scalable Video Technology for AV1 encoding |
x264 |
x264 for H.264/MPEG-4 AVC encoding |
dav1d |
dav1d for AV1 decoding |
libVA |
VAAPI (Video Acceleration API) open-source library (LibVA), which provides access to graphics hardware acceleration capabilities. |
media-driver |
Intel® Media Driver for VAAPI for supporting hardware acceleration on Intel® Gen graphics hardware platforms. |
gmmlib |
Intel® Graphics Memory Management Library provides device specific and buffer management for the Intel® Graphics Compute Runtime for OpenCL(TM) and the Intel® Media Driver for VAAPI. |
Intel® Compute Runtime NEO |
Intel® Graphics Compute Runtime for oneAPI Level Zero and OpenCL(TM) Driver an open source project providing compute API support (Level Zero, OpenCL) for Intel graphics hardware architectures (HD Graphics, Xe). |
Components of the MeRS include:
Ubuntu OS as a base for performance and security.
OpenVINO™ toolkit for inference.
OpenVINO Plugins:
Plugin
Device Type
CPU
Intel® Xeon® with Intel® AVX2 and AVX512, Intel® Core™ Processors with Intel® AVX2, Intel® Atom® Processors with Intel® SSE
GPU
Intel® Processor Graphics, including Intel® HD Graphics and Intel® Iris® Graphics
HETERO
Automatic splitting of a network inference between several devices (for example if a device doesn’t support certain layers
MULTI
Simultaneous inference of the same network on several devices in parallel
FFmpeg* with:
GStreamer* with plugins for:
Note
The MeRS is validated on 12th generation Intel® Processor Graphics, Intel® Xeon® Cascade Lake and newer. Older generations should work but are not tested against.
Note
The pre-built MeRS container image configures FFmpeg without certain elements (specific encoder, decoder, muxer, etc.) that you may require. If you require changes to FFmpeg we suggest starting at Build the MeRS container image from source.
Note
The Media Reference Stack is a collective work, and each piece of software within the work has its own license. Please see the MeRS Terms of Use for more details about licensing and usage of the Media Reference Stack.
Get the pre-built MeRS container image
Pre-built MeRS Docker images are available on DockerHub* at https://hub.docker.com/r/sysstacks/mers-ubuntu
To use the MeRS:
Pull the image directly from Docker Hub.
docker pull sysstacks/mers-ubuntu
Note
The MeRS docker image is large in size and will take some time to download depending on your Internet connection.
If you are on a network with outbound proxies, be sure to configure Docker to allow access. See the Docker service proxy and Docker client proxy documentation for more details.
Once you have downloaded the image, run it using the following command:
docker run -it sysstacks/mers-ubuntu
This will launch the image and drop you into a bash shell inside the container. GStreamer and FFmpeg programs are installed in the container image and accessible in the default $PATH. Use these programs as you would outside of MeRS.
Paths to media files, can be shared from the host to the container with the --volume switch using Docker volumes.
Build the MeRS container image from source
If you choose to build your own MeRS container image, you can optionally add
customizations as needed. The Dockerfile for the MeRS is available on
GitHub and can be used
as a reference when creating your own container image.
Clone the
stacksrepository.git clone https://github.com/intel/stacks.git
Navigate to the
stacks/mers/ubuntudirectory which contains the Dockerfile for the MeRS.cd ./stacks/mers/ubuntuUse the docker build command with the
Dockerfileto build the MeRS container image.docker build --no-cache -t sysstacks/mers-ubuntu .
Use the MeRS container image
This section shows examples of how the MeRS container image can be used to process media files.
The models and video source can be substituted from your use-case. Some publicly licensed sample videos are available at sample-videos repository for testing.
Media Transcoding
The examples below show transcoding using the GPU or CPU for processing.
On the host system, setup a workspace for data and models:
mkdir ~/ffmpeg
mkdir ~/ffmpeg/input
mkdir ~/ffmpeg/output
Copy a video file to
~/ffmpeg/input.cp </path/to/video> ~/ffmpeg/input
Run the sysstacks/mers-ubuntu Docker image, allowing shared access to the workspace on the host:
docker run -it \
--volume ~/ffmpeg:/home/mers-user:ro \
--device=/dev/dri \
--env QSV_DEVICE=/dev/dri/renderD128 \
sysstacks/mers-ubuntu:latest
Note
The --device parameter and the GSV_DEVICE environment variable allow shared access to the GPU on the host system. The values needed may be different depending on host’s graphics configuration.
After running the docker run command, you enter a bash shell inside the container.
From the container shell, you can run FFmpeg and GStreamer commands against the videos in
/home/mers-user/inputas you would normally outside of MeRS.Some sample commands are provided for reference.
For more information on using the FFmpeg commands, refer to the FFmpeg documentation.
For more information on using the GStreamer commands, refer to the GStreamer documentation.
Example: Transcoding using GPU
The examples below show transcoding using the GPU for processing.
Using a FFmpeg to transcode raw content to SVT-HEVC and mp4:
ffmpeg -y -vaapi_device /dev/dri/renderD128 -f rawvideo -video_size 320x240 -r 30 -i </home/mers-user/input/test.yuv> -vf 'format=nv12, hwupload' -c:v h264_vaapi -y </home/mers-user/output/test.mp4>
Using a GStreamer to transcode H264 to H265:
gst-launch-1.0 filesrc location=</home/mers-user/input/test.264> ! h264parse ! vaapih264dec ! vaapih265enc rate-control=cbr bitrate=5000 ! video/x-h265,profile=main ! h265parse ! filesink location=</home/mers-user/output/test.265>
MeRS builds FFmpeg with HWAccel enabled which supports VAAPI. Refer to the FFmpeg wiki on VAAPI and GStreamer with Media-SDK wiki for more usage examples and compatibility information.
Example: Transcoding using CPU
The example below shows transcoding of raw yuv420 content to SVT-HEVC and mp4, using the CPU for processing.
ffmpeg -f rawvideo -vcodec rawvideo -s 320x240 -r 30 -pix_fmt yuv420p -i </home/mers-user/input/test.yuv> -c:v libsvt_hevc -y </home/mers-user/output/test.mp4>
Additional generic examples of FFmpeg commands can be found in the OpenVisualCloud repository and used for reference with MeRS.
Media Analytics
These examples shows how to perform analytics and inferences with GStreamer using the CPU, the GPU and the CPU+GPU devices for processing.
The steps here are referenced from the gst-video-analytics Getting Started Guide except simply substituting the gst-video-analytics docker image for the sysstacks/mers-ubuntu image.
The example below shows how to use the MERS container image to perform video with object detection and attributes recognition of a video using GStreamer using pre-trained models and sample video files using the different OpenVINO plugins packaged within MeRS v0.4.0
The CPU Plugin
The GPU Pluin
OpenVINO CPU Plugin example on MeRS
On the host system, setup a workspace for data and models:
mkdir -p ~/gva/data/models/common
mkdir -p ~/gva/data/models/intel
mkdir -p ~/gva/data/video
Clone the opencv/gst-video-analytics repository at v1.3 branch into the workspace:
git clone -b v1.3 https://github.com/opencv/gst-video-analytics ~/gva/gst-video-analytics
Clone the Open Model Zoo repository at 2021.2 branch into the workspace:
git clone -b 2021.2 https://github.com/opencv/open_model_zoo.git ~/gva/open_model_zooUse the Model Downloader tool of Open Model Zoo to download ready to use pre-trained models in IR format.
Note
If you are on a network with outbound proxies, you will need to configure set environment variables with the proxy server. Refer to the documentation on help.ubuntu.com for detailed steps.
for lst_file in $(find ~/gva/gst-video-analytics/samples -iname '*lst*'); do
   python3 ~/gva/open_model_zoo/tools/downloader/downloader.py --list ${lst_file} -o ~/gva/data/models/intel
done
Copy a video file in h264 or mp4 format to
~/gva/data/video. Any video with cars, pedestrians, human bodies, and/or human faces can be used.git clone https://github.com/intel-iot-devkit/sample-videos.git ~/gva/data/video
This example simply clones all the video files from the sample-videos repsoitory.
From a desktop terminal, allow local access to the X host display.
xhost local:root

export DATA_PATH=~/gva/data
export GVA_PATH=~/gva/gst-video-analytics
export MODELS_PATH=~/gva/data/models
export INTEL_MODELS_PATH=~/gva/data/models/intel
export VIDEO_EXAMPLES_PATH=~/gva/data/video
Run the sysstacks/mers-ubuntu docker image, allowing shared access to the X server and workspace on the host:
docker run -it --runtime=runc --privileged --net=host \
$(env | grep -E '(_proxy=|_PROXY)' | sed 's/^/-e /') \
-v ~/.Xauthority:/root/.Xauthority \
-v /tmp/.X11-unix:/tmp/.X11-unix \
-v $GVA_PATH:/home/mers-user/gst-video-analytics \
-v $INTEL_MODELS_PATH:/home/mers-user/intel_models \
-v $MODELS_PATH:/home/mers-user/models \
-v $VIDEO_EXAMPLES_PATH:/home/mers-user/video-examples \
-e MODELS_PATH=/home/mers-user/intel_models:/home/mers-user/models \
-e VIDEO_EXAMPLES_DIR=/home/mers-user/video-examples \
sysstacks/mers-ubuntu:latest
Note
In the docker run command above:
--runtime=runc specifies the container runtime to be runc for this container. It is needed for correct interaction with X server.
--net=host provides host network access to the container. It is needed for correct interaction with X server.
Files
~/.Xauthorityand/tmp/.X11-unixmapped to the container are needed to ensure smooth authentication with X server.-v instances are needed to map host system directories inside the Docker container.
-e instances set the Docker container environment variables. Some examples need these variables set correctly in order to operate correctly. Proxy variables are needed if host is behind a firewall.
After running the docker run command, it will drop you into a bash shell inside the container.
From the container shell, run a sample analytics program in
~/gva/gst-video-analytics/samplesagainst your video source.Below are sample analytics that can be run against the sample videos. Choose one to run:
Samples with face detection and classification:
./gst-video-analytics/samples/gst_launch/face_detection_and_classification/face_detection_and_classification.sh $VIDEO_EXAMPLES_DIR/face-demographics-walking-and-pause.mp4
./gst-video-analytics/samples/gst_launch/face_detection_and_classification/face_detection_and_classification.sh $VIDEO_EXAMPLES_DIR/face-demographics-walking.mp4
./gst-video-analytics/samples/gst_launch/face_detection_and_classification/face_detection_and_classification.sh $VIDEO_EXAMPLES_DIR/head-pose-face-detection-female-and-male.mp4
./gst-video-analytics/samples/gst_launch/face_detection_and_classification/face_detection_and_classification.sh $VIDEO_EXAMPLES_DIR/head-pose-face-detection-male.mp4
./gst-video-analytics/samples/gst_launch/face_detection_and_classification/face_detection_and_classification.sh $VIDEO_EXAMPLES_DIR/head-pose-face-detection-female.mp4
When running, a video with object detection and attributes recognition (bounding boxes around faces with recognized attributes) should be played.
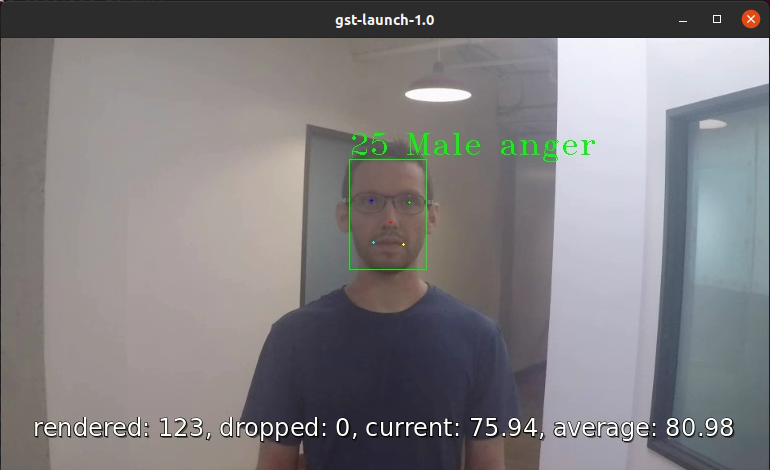
Figure 1: Screenshot of MeRS running face detection with GSTreamer and OpenVINO.
Sample with vehicle pedestrian tracking:
./gst-video-analytics/samples/gst_launch/vehicle_pedestrian_tracking/vehicle_pedestrian_tracking.sh $VIDEO_EXAMPLES_DIR/car-detection.mp4When running, a video with object detection and attributes recognition (bounding boxes around vehicles with recognized attributes) should be played.
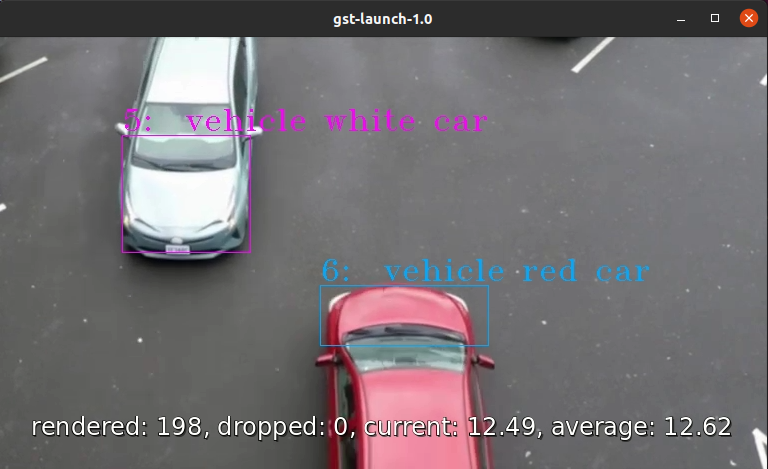
Figure 2: Screenshot of MeRS running vehicle pedestrian tracking with GSTreamer and OpenVINO.
Sample with face detection and classification using web camera device (ex. /dev/video0):
sed -i 's/ decodebin / videoconvert /g' gst-video-analytics/samples/gst_launch/face_detection_and_classification/face_detection_and_classification.sh
./gst-video-analytics/samples/gst_launch/face_detection_and_classification/face_detection_and_classification.sh /dev/video0
When running, a video with object detection and attributes recognition (bounding boxes around faces with recognized attributes) should be played.
OpenVINO GPU Plugin example on MeRS
Run the sysstacks/mers-ubuntu docker image, allowing shared access to the X server and workspace on the host:
docker run -it --runtime=runc --privileged --net=host \
$(env | grep -E '(_proxy=|_PROXY)' | sed 's/^/-e /') \
-v ~/.Xauthority:/root/.Xauthority \
-v /tmp/.X11-unix:/tmp/.X11-unix \
-v $GVA_PATH:/home/mers-user/gst-video-analytics \
-v $INTEL_MODELS_PATH:/home/mers-user/intel_models \
-v $MODELS_PATH:/home/mers-user/models \
-v $VIDEO_EXAMPLES_PATH:/home/mers-user/video-examples \
-e MODELS_PATH=/home/mers-user/intel_models:/home/mers-user/models \
-e VIDEO_EXAMPLES_DIR=/home/mers-user/video-examples \
sysstacks/mers-ubuntu:latest
By default gst-video-analytics samples use CPU device for Analytics. To change this refer to
~/gva/gst-video-analytics/samples/gst_launchfolder and replace atface_detection_and_classification.shorvehicle_pedestrian_tracking.shthe DEVICE=CPU line for DEVICE=GPUsed -i 's/\(DEVICE=\)\(.*\)/\1GPU/' gst-video-analytics/samples/gst_launch/face_detection_and_classification/face_detection_and_classification.shExecute examples as shown in step 8 at OpenVINO CPU Plugin example on MeRS
OpenVINO MULTI Plugin example on MeRS
Run the sysstacks/mers-ubuntu docker image, allowing shared access to the X server and workspace on the host:
docker run -it --runtime=runc --privileged --net=host \
$(env | grep -E '(_proxy=|_PROXY)' | sed 's/^/-e /') \
-v ~/.Xauthority:/root/.Xauthority \
-v /tmp/.X11-unix:/tmp/.X11-unix \
-v $GVA_PATH:/home/mers-user/gst-video-analytics \
-v $INTEL_MODELS_PATH:/home/mers-user/intel_models \
-v $MODELS_PATH:/home/mers-user/models \
-v $VIDEO_EXAMPLES_PATH:/home/mers-user/video-examples \
-e MODELS_PATH=/home/mers-user/intel_models:/home/mers-user/models \
-e VIDEO_EXAMPLES_DIR=/home/mers-user/video-examples \
sysstacks/mers-ubuntu:latest
By default gst-video-analytics samples use CPU device for Analytics. To change this refer to
~/gva/gst-video-analytics/samples/gst_launchfolder and replace atface_detection_and_classification.shorvehicle_pedestrian_tracking.shthe DEVICE=CPU line for DEVICE=MULTI:CPU,GPUsed -i 's/\(DEVICE=\)\(.*\)/\1MULTI:CPU,GPU/' gst-video-analytics/samples/gst_launch/face_detection_and_classification/face_detection_and_classification.shExecute examples as shown in step 8 at OpenVINO CPU Plugin example on MeRS
Add AOM support
The current version of MeRS does not include the Alliance for Open Media Video Codec (AOM). AOM can be built from source on an individual basis.
To add AOM support to the MeRS image:
The following programs are needed to add AOM support to MeRS: docker, git, patch. On Ubuntu OS these can be installed with the commands below. For other operating systems, install the appropriate packages.
sudo apt install git docker
Clone the Intel Stacks repository from GitHub.
git clone https://github.com/intel/stacks.git
Navigate to the directory for the MeRS image.
cd stacks/mers/ubuntu/Apply the patch to the
Dockerfile.patch -p1 < aom-patches/stacks_mers-v3-include-aom.diff
Use the docker build command to build a local copy of the MeRS container image tagged as aom.
docker build --no-cache -t sysstacks/mers-ubuntu:aom .
Once the build has completed successfully, the local image can be used following the same steps in this tutorial by substituting the image name with sysstacks/mers-ubuntu:aom.
Intel, Xeon, OpenVINO, and the Intel logo are trademarks of Intel Corporation or its subsidiaries.