HPCRS Tutorial – Creating an Environment for Running Workloads
In this tutorial we will walk through the steps to setup an environment for running workloads with the High Performance Computing Reference Stack (HPCRS), using Kubernetes*, MPI*, and the HPCRS image with QE* in a HPC cloud environment.
We have tested these instructions with the following hardware and software configurations. This tutorial uses networking information like IP addresses that reflects our test network. Please update these instructions to reflect your network setup.
Hardware Configuration
2 socket Intel® Xeon® Platinum 8380 Processor (2.3GHz, 40 cores)
We tested with 3 nodes in our cluster:
Kubernetes master
Kubernetes workers (2)
Software Prerequisites
For each of the three nodes in the cluster:
OS: We used CentOS 8 for all three nodes.
Setup ssh access without password. For details refer to https://www.ibm.com/support/pages/configuring-ssh-login-without-password
Install Kubernetes (v1.19.2) and Docker* (v19.03.12). Refer to https://www.tecmint.com/install-a-kubernetes-cluster-on-centos-8/
Install cri-o (v1.19.0). Refer to https://computingforgeeks.com/install-cri-o-container-runtime-on-centos-linux/
Software Configuration
On each node:
Configure Kubernetes to enable IP forwarding
Ensure net.ipv4.ip_forward is set to “1” in the /etc/sysctl.d/60-k8s.conf file. You may need to create this file if it does not exist.
  #cat /etc/sysctl.d/60-k8s.conf
  net.ipv4.ip_forward = 1
Restart systmctl to pick up the change:
#systemctl restart systemd-sysctl
Disable swap
#swapoff -aConfigure the /etc/hosts file for all nodes
#echo "127.0.0.1 localhost <hostname>" >> /etc/hostsAdd the IP address and corresponding hostname to /etc/hosts for all 3 nodes. Replace
<x.x.x.x>with the IP addresses specific to your setup.
#tail -3 /etc/hosts
  <x.x.x.x> node1
  <x.x.x.x> node2
  <x.x.x.x> node3
Setup Docker and cri-o proxy for all nodes
#cat /etc/systemd/system/docker.service.d/proxy.conf
[Service]
Environment="HTTP_PROXY=<your proxy if needed>"
Environment="HTTPS_PROXY=<your proxy if needed>"
Environment="NO_PROXY=192.168.0.0/16,10.0.0.0/8,localhost,127.0.0.0/8,<your network specific addresses>
#cat /etc/sysconfig/crio
HTTP_PROXY=<your proxy if needed>
HTTPS_PROXY=<your proxy if needed>
NO_PROXY=i192.168.0.0/16,10.0.0.0/8,localhost,127.0.0.0/8,<your network specific addresses>"
Setup the Docker registry on which we host the HPCRS image (sysstacks/hpcrs-centos:latest docker image + QE installed), and from which Kubernetes will deploy the latest image.
#cat /etc/containers/registries.conf
#master will also act as local registry, add below to bypass insecure error
[registries.insecure]
registries = ["<your registry IP address>:5000"]
Configure kubelet for the correct CPU policy
#cat /etc/sysconfig/kubelet
KUBELET_EXTRA_ARGS=--cgroup-driver=systemd  --cpu-manager-policy=static --kube-reserved=cpu=1,memory=2Gi,ephemeral-storage=1Gi --system-reserved=cpu=1,memory=2Gi,ephemeral-storage=1Gi
Restart and enable all related services
#systemctl restart crio
#systemctl restart docker
#systemctl restart kubelet
Configuring the Kubernetes master
Install podman (v1.6.4)
#dnf install podmanInstall helm (v3.3.4). Follow the instructions at https://www.techrepublic.com/article/how-to-install-the-kubernetes-package-manager-helm/
Setup the local registry for the cri image
Setup the local registry on the master node, and download the HPCRS stack image:
#docker pull docker.io/registry
#docker run -d -p 5000:5000 --name=registry --restart=always --privileged=true  --log-driver=none -v /registery:/tmp/registry registry
#docker pull <your registry address or url>/sysstacks/hpcrs-centos:v0.2.0
Modify the Dockerfile to add QE based on the HPCRS stack image
# vi Dockerfile From <your registry url>/sysstacks/hpcrs-centos:v0.2.0
Add and Build QE
For details on QE refer to: https://hpc-forge.cineca.it/files/gara_tier_1/public/Benchmark-Instructions.txt.
Add the following to your Dockerfile to build the image:
From <x.x.x.x>:5000/hpcrstest:test

#Proxy Settings
ARG proxy=<your proxy if needed>
ENV http_proxy=$proxy
ENV https_proxy=$proxy

#Install ssh and Generate ssh Host Keys
RUN yum update --disablerepo=intel-graphics --disablerepo=oneAPI -y && yum install --disablerepo=intel-graphics --disablerepo=oneAPI -y openssh-server
COPY ssh-entrypoint.sh /bin/ssh-entrypoint.sh
RUN chmod +x /bin/ssh-entrypoint.sh
RUN ssh-entrypoint.sh

#Fix ssh Login Issue
RUN usermod -p ! root
RUN mkdir -p /etc/ssh/
RUN echo "Port 2022" > /etc/ssh/sshd_config
Create the cri image based on HPCRS in the registry
  #cd image
   #podman build -t hpcrstestcri:cri --build-arg proxy=$http_proxy -f Dockerfile .
   #podman push hpcrstestcri:cri --tls-verify=false docker://localhost:5000/hpcrstestcri:cri
Copy the config to the root user directory and install flannel
   #mkdir -p $HOME/.kube && cp /etc/kubernetes/admin.conf $HOME/.kube/config
   #kubectl apply -f https://raw.githubusercontent.com/coreos/flannel/master/Documentation/kube-flannel.yml
Init the Kubernetes cluster
  #kubeadm reset --cri-socket=/run/crio/crio.sock -f
  #kubeadm init --apiserver-advertise-address <x.x.x.x> --pod-network-cidr <x.x.x.x>/16 --cri-socket=/run/crio/crio.sock --ignore-preflight-errors=SystemVerification --token-ttl=0
Record the last command in the log, which will be used to join workers to the Kubernetes cluster, such as:
kubeadm init --apiserver-advertise-address <your network address> --pod-network-cidr <your network address>/16 --cri-socket=/run/crio/crio.sock --ignore-preflight-errors=SystemVerification --token-ttl=0
Run the following commands on each worker to join the cluster:
#kubeadm join <your network address>:6443 --token tceoji.65vxsvcv8z5vzce2 --discovery-token-ca-cert-hash sha256:d4b3848ff2d5a242b63037687351805abb7abecc8a260e77905ca61d9d077758
NOTE:
Make sure the time is aligned across worker and master nodes, checking with the Linux
#datecommand.
Run QE on the HPCRS image
All commands are run on the Kubernetes master node.
  #export NAMESPACE=helm
  #kubectl delete namespace ${NAMESPACE}
  #kubectl create namespace ${NAMESPACE}
  #SECRET=hpc-secret
  #mkdir -p .tmp
  #yes | ssh-keygen -N "" -f .tmp/id_rsa -C ""
  #kubectl delete secret ${SECRET} -n ${NAMESPACE} || true
  #kubectl create secret generic ${SECRET} -n ${NAMESPACE} --from-file=id_rsa=.tmp/id_rsa --from-file=id_rsa.pub=.tmp/id_rsa.pub --from-file=authorized_keys=.tmp/id_rsa.pub
  #kubectl config set-context --current --namespace=$NAMESPACE
  #helm template --values ./values.yaml hpc ./horovod > debug.yml
  #kubectl apply -f debug.yml --validate=false
QE will be triggered and you can check the logs through these commands:
#kubectl get pods
[root@a4bf0157a8d7 k8s]# kubectl get pods
NAME            	READY   STATUS	RESTARTS   AGE
hpc-horovod-0   	1/1 	Running   0      	2m8s
hpc-horovod-zzxdx   1/1 	Running   2      	2m8s
Check the logs of a specific pod with this command:
#kubectl logs -f hpc-horovod-zzxdx
+ sleep 5
+ mkdir -p /root/.ssh
+ rm -f /root/.ssh/config
+ touch /root/.ssh/config
+ '[' true == true ']'
+ set +e
+ yes
+ cp /etc/secret-volume/id_rsa /root/.ssh/id_rsa
+ yes
+ cp /etc/secret-volume/authorized_keys /root/.ssh/authorized_keys
+ set -e
+ '[' -n 32222 ']'
+ echo 'Port 32222'
+ sed -i 's/^Port.*/Port 32222 /g' /etc/ssh/sshd_config
+ echo 'StrictHostKeyChecking no'
+ /usr/sbin/sshd
+ runCheckSSH /horovod/generated/hostfile
++ cat /horovod/generated/hostfile
++ awk '{print $(1)}'
+ for i in `cat $1 | awk '{print $(1)}'`
+ [[ <x.x.x.x> != *\m\a\s\t\e\r ]]
+ retry 30 ssh -o ConnectTimeout=2 -q <x.x.x.x> exit
+ local n=0
+ local try=30
+ local 'cmd=ssh -o ConnectTimeout=2 -q <x.x.x.x> exit'
+ [[ 7 -le 1 ]]
+ set +e
+ [[ 0 -ge 30 ]]
+ ssh -o ConnectTimeout=2 -q <x.x.x.x> exit
+ break
+ ssh -o ConnectTimeout=2 -q <x.x.x.x> exit
+ '[' 0 -ne 0 ']'
+ set -e
+ for i in `cat $1 | awk '{print $(1)}'`
+ [[ 10.165.9.31 != *\m\a\s\t\e\r ]]
+ retry 30 ssh -o ConnectTimeout=2 -q <x.x.x.x> exit
+ local n=0
+ local try=30
+ local 'cmd=ssh -o ConnectTimeout=2 -q <x.x.x.x> exit'
+ [[ 7 -le 1 ]]
+ set +e
+ [[ 0 -ge 30 ]]
+ ssh -o ConnectTimeout=2 -q <x.x.x.x> exit
+ break
+ ssh -o ConnectTimeout=2 -q <x.x.x.x> exit
+ '[' 0 -ne 0 ']'
+ set -e
+ '[' 0 -ne 0 ']'
+ '[' 1 -eq 0 ']'
+ bash -c 'cd /root/benchmarks/AUSURF112/ && source /opt/intel/bin/compilervars.sh intel64 && mpir 24 --hostfile /horovod/generated/hostfile -genv I_MPI_DEBUG 4 -genv I_MPI_PIN_DOMAIN omp -genv I_h -genv OMP_PROC_BIND CLOSE -genv OMP_PLACES threads -genv OMP_NUM_THREADS 2 /root/q-e/bin/pw.x -iAUSURF112/ausurf.in -npool 2
After running the workload, it will output the performance data, for example:
PWSCF : 1m52.95s CPU 0m32.17s WALL
PyTorch benchmarks
This section describes running the PyTorch benchmarks for Caffe2 in single node.
Pull the image:
docker pull sysstacks/hpcrs-centos
NOTE:
If you are on a network with outbound proxies, be sure to configure Docker to allow access. See the Docker service proxy and Docker client proxy documentation for more details.
Run the image with Docker:
docker run --name <image name> --rm -i -t sysstacks/hpcrs-centos /bin/bash
NOTE:
Launching the Docker image with the
-iargument starts interactive mode within the container. Enter the following commands in the running container.Navigate to to where Pytorch and Caffe are installed:
cd /usr/lib/python3.8/site-packages/caffe2/python/Install dependencies for the benchmark:
pip install protobuf
pip install future
Execute the benchmark script:
python convnet_benchmarks.py --batch_size 32 \
                             --cpu \
                             --model AlexNet
Using DCP++
Data Parallel C++ (DPC++) is a high-level language designed for data parallel programming productivity. A sample file is included to show how to use DPC++ with the HPCRS image.
To test DPC++:
clang++ -I $DPCPP_ROOT/include/sycl test_dpcpp.cpp -L $DPCPP_ROOT/lib -fsycl
./a.out
If running on a CPU, the program will compile and an this output is expected:
  test dpcpp platform-1 device-1 ...
  Non-GPU device
Using Spack* to list available recipes
Spack is a program manager for supercomputers, Linux and macOS, and is included in the HPCRS image. Using Spack in the HPCRS image is straighforward.
Pull the image:
docker pull sysstacks/hpcrs-centos
NOTE:
If you are on a network with outbound proxies, be sure to configure Docker to allow access. See the Docker service proxy and Docker client proxy documentation for more details.
Run the image with Docker, launching in interactive mode with the
-iflag:docker run --name <image name> --rm -i -t sysstacks/hpcrs-centos /bin/bashRun the following at the bash prompt:
# to list available recipes:
> spack list
# to get info on a specific recipe, use `spack info`:
> spack info zlib
# to install a recipe:
> spack install zlib
HPCRS and the Intel® VTune™ Profiler
Intel® VTune™ Profiler allows you to profile applications running in Docker* containers, including profiling multiple containers simultaneously. More information about VTune Profiler is available at software.intel.com
Prerequisites
This section of the tutorial assumes the following prerequisites are met
Intel VTune Profiler 2020
Linux* container runtime: docker.io
Operating System on host: Ubuntu* or CentOS with Linux kernel version 4.10 or newer
Intel(r) microarchitecture code named Skylake with 8 logical CPUs
Pull the image onto the VTune enabled system:
docker pull sysstacks/hpcrs-centosRun the container and keep it running with the
-tand-doptionsdocker run --name <image name> -td <sysstacks/hpcrs-centos>Find the container ID with the
docker pscommandhost> docker ps CONTAINER ID IMAGE COMMAND CREATED STATUS PORTS NAMES 98fec14f0c08 hpcrs_test "/bin/bash" 10 seconds ago Up 9 seconds
Use the container ID to ensure bash is running in the background
docker exec -it 98fec14f0c08 /bin/bash
Use VTune to collect and analyze data
Launch the VTune Profiler on the host, for example:
host> cd /opt/intel/vtune_profiler
host> source ./vtune-vars.sh
host> vtune-gui
Create a project for your analysis in VTune, for example:
python-benchmarkRun an application within the HPCRS container
For example, run the python benchmarks as shown above
On the Configure Analysis tab in VTune, configure the following options:
On the WHAT pane, select the Profile System target type
Select the Hardware Event-Based Sampling mode
On the HOW pane, enable stack collection
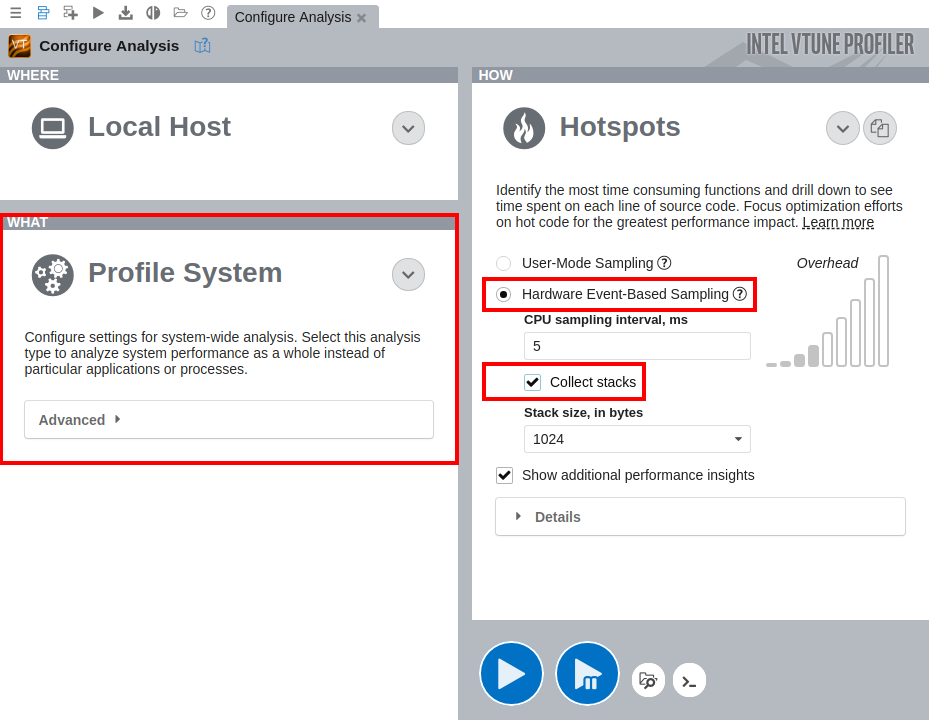
Click Start to run the analysis.
You can also profile Docker containers using the Attach to Process target type, but you will only be able to profile a single container at a time.
For more information on Intel VTune Profiler capabilites, refer to the Intel® VTune™ Profiler Performance Analysis Cookbook