Advanced Auto Mixed Precision
Mixed Precision uses lower-precision data types (such as FP16 or BF16) to make models run faster with less memory consumption during training and inference.
Stock TensorFlow provides two ways to do this, Grappler Graph Optimization Auto Mixed Precision (AMP) and Keras mixed precision API.
Intel® Extension for TensorFlow* is fully compatible with Keras mixed precision API in Stock TensorFlow, and provides an Advanced Auto Mixed Precision feature for better performance.
Overview
Intel® Extension for TensorFlow* provides two ways to support mixed precision:
I. Keras Mixed Precision
Intel® Extension for TensorFlow* is fully compatible with Keras mixed precision API available in Stock TensorFlow. To learn about Keras mixed precision, refer to Keras Mixed Precision.
II. Advanced Auto Mixed Precision
Advanced Auto Mixed Precision (Advanced AMP) is similar to stock TensorFlow Auto Mixed Precision, but it offers better usage and performance on Intel CPU and GPU.
| Feature | Keras Mixed Precision API | Advanced Auto Mixed Precision |
|---|---|---|
| Python Model | Yes | Yes |
| Frozen Graph (PB) model | Yes | |
| Based on Operation Type | Yes | |
| Based on Operation Name | Yes |
Advanced Auto Mixed Precision
Advanced AMP vs. Stock TensorFlow AMP
| Advanced AMP | Stock TensorFlow AMP | |
|---|---|---|
| Intel CPU | Yes | Yes |
| Intel GPU | Yes | |
| Custom operations provided by Intel® Extension for TensorFlow* such as LayerNorm, InstanceNorm and Swish |
Yes | |
| Python API | Yes | Yes |
| Environment Variable API | Yes | Yes |
Data Type
Advanced Auto Mixed Precision supports data type depended on hardware:
| FP16 | BF16 | |
|---|---|---|
| Intel CPU | No | Yes |
| Intel GPU | Yes | Yes |
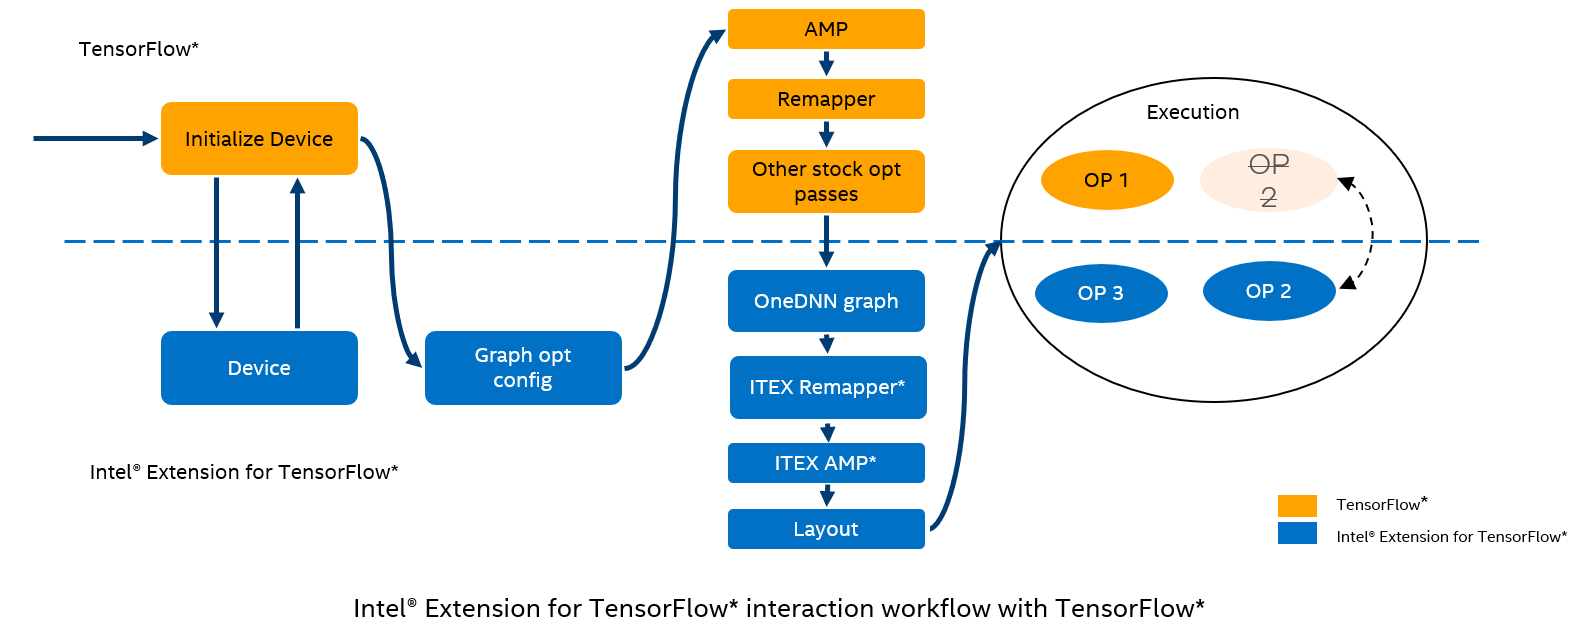
Graph Optimizer
Intel® Extension for TensorFlow* graph optimizer provides more powerful optimization for mixed precision graph versus a stock TensorFlow custom graph optimizer.
I. After Advanced AMP of Intel® Extension for TensorFlow* is enabled, the stock TensorFlow AMP components: AMP and Remapper will be disabled automatically.
II. Intel® Extension for TensorFlow* AMP and Remapper work for mixed precision. The order is changed to Remapper, then AMP, so that fusion operations can be mixed precision.
III. Intel® Extension for TensorFlow* implements some existing operations to cover those in stock TensorFlow, for better performance in Intel hardware.
IV. Intel® Extension for TensorFlow* implements custom operations.
Feature
Advanced AMP based on Intel® Extension for TensorFlow* has more features to improve performance than stock TensorFlow AMP:
Provides more aggressive sub-graph fusion, such as LayerNorm and InstanceNorm fusion.
Supports mixed precision in fused Operations, which are not supported by stock TensorFlow.
Tune Advanced AMP Manually
In most cases, with default configuration, Advanced AMP delivers good results with balanced performance and accuracy. For advanced users with more knowledge of model and TensorFlow, it is possible to manually tune Advanced AMP for special cases or custom operations.
Refer to Tune Advanced Auto Mixed Precision for advanced operations.
Usage
I. Install Intel® Extension for TensorFlow* in running environment.
After Installing Intel® Extension for TensorFlow*, it will automatically activate as a plugin of stock TensorFlow.
Refer to installation instructions for more details.
II. Enable Advanced AMP.
With the default configuration, the Advanced AMP has a good balance between performance and accuracy in most cases.
| Python API | Environment Variable | |
|---|---|---|
| Basic (Default configuration) | import intel_extension_for_tensorflow as itexauto_mixed_precision_options = itex.AutoMixedPrecisionOptions()auto_mixed_precision_options.data_type = itex.BFLOAT16 #itex.FLOAT16graph_options = itex.GraphOptions(auto_mixed_precision_options=auto_mixed_precision_options)graph_options.auto_mixed_precision = itex.ONconfig = itex.ConfigProto(graph_options=graph_options)itex.set_config(config) |
export ITEX_AUTO_MIXED_PRECISION=1export ITEX_AUTO_MIXED_PRECISION_DATA_TYPE="BFLOAT16" #"FLOAT16" |
III. Use the Python API or environment variables to manually tune Advanced AMP for better performance, accuracy, or both.
| Python API | Environment Variable | |
|---|---|---|
| Advanced Configuration | auto_mixed_precision_options.allowlist_add= "AvgPool3D,AvgPool"auto_mixed_precision_options.inferlist_remove = "AvgPool3D,AvgPool" |
export ITEX_AUTO_MIXED_PRECISION_ALLOWLIST_ADD="AvgPool3D,AvgPool"export ITEX_AUTO_MIXED_PRECISION_INFERLIST_REMOVE="AvgPool3D,AvgPool" |
Refer to Usage
Example
Quick Training Example
Train model for BF16 with Advanced AMP on GPU device.
Setup
Install Intel® Extension for TensorFlow*, refer to installation.
Enable Advanced AMP
Use either the Python API or the environment variables to enable Advanced AMP.
| Python API | Environment Variable |
|---|---|
import intel_extension_for_tensorflow as itexauto_mixed_precision_options = itex.AutoMixedPrecisionOptions()auto_mixed_precision_options.data_type = itex.BFLOAT16graph_options = itex.GraphOptions(auto_mixed_precision_options=auto_mixed_precision_options)graph_options.auto_mixed_precision = itex.ONconfig = itex.ConfigProto(graph_options=graph_options)itex.set_config(config) |
export ITEX_AUTO_MIXED_PRECISION=1export ITEX_AUTO_MIXED_PRECISION_DATA_TYPE="BFLOAT16" |
Original Code
Insert the Python API above in the original code, or set environment variables above before executing the original code.
import tensorflow as tf
from tensorflow import keras
from tensorflow.keras import layers


if tf.config.list_physical_devices('XPU'):
  print('The model will run with 4096 units on an XPU')
  num_units = 4096
else:
  print('The model will run with 64 units on a CPU')
  num_units = 64

inputs = keras.Input(shape=(784,), name='digits')
x = layers.Dense(num_units, activation='relu', name='dense_1')(inputs)
x = layers.Dense(num_units, activation='relu', name='dense_2')(x)
x = layers.Dense(10, name='dense_logits')(x)
x = layers.Activation('softmax', dtype='float32', name='predictions')(x)
outputs = layers.Activation('linear', dtype='float32')(x)

model = keras.Model(inputs=inputs, outputs=outputs)
model.compile(loss='sparse_categorical_crossentropy',
              optimizer=keras.optimizers.RMSprop(),
              metrics=['accuracy'])

(x_train, y_train), (x_test, y_test) = keras.datasets.mnist.load_data()
x_train = x_train.reshape(60000, 784).astype('float32') / 255
x_test = x_test.reshape(10000, 784).astype('float32') / 255

history = model.fit(x_train, y_train, batch_size=8192, epochs=5,
                    validation_split=0.2)
test_scores = model.evaluate(x_test, y_test, verbose=2)
print('Test loss:', test_scores[0])
print('Test accuracy:', test_scores[1])
Notice
The first epoch may be slower because TensorFlow optimizes the model during the first run. In subsequent epochs, the time will stabilize.
Tips
Log and Save Optimized Graph
Advanced AMP supports outputting the log and optimized graph by setting an environment variable:
export ITEX_AUTO_MIXED_PRECISION_LOG_PATH="/my/path/"
It will trigger Intel® Extension for TensorFlow* to save the post optimization graph and detailed conversion log to a local folder.
Use this to check the structure of the final graph to learn the mixed precision status. It also helps to know the rules to convert operations from FP32 to BF16.
For detailed introduction, refer to Tuning Performance Example by Advanced AMP Configure List Manually
Custom Operation
When writing a custom operation, add it to the configuration list to enable Advanced AMP.
Refer to Tune Advanced Auto Mixed Precision for more details.