Host System Environment Preparation
Note
These steps are required when configuring the host system to support virtualization.
Updating the BIOS Settings
Enter to the BIOS setup.
Enable the VT-d parameter in BIOS. This setting is usually under
Socket configuration > IIO configuration > Intel VT-d.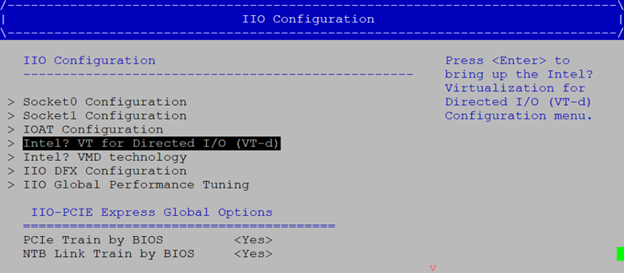
Enable SR-IOV in BIOS. This setting is usually under
Platform Configuration > Miscellaneous Configuration > SR-IOV Support.
Configuring the Host OS
Check the kernel requirements are met.
Verify appropriate kernel boot parameters are defined using the following command:
cat /proc/cmdlineIf the parameters are not defined, the
grubbycommand can be used to add the parameters. Reboot the system after adding the kernel parameters, and verify they are correct with the above command.Grubby Instructions:
grubby --update-kernel=ALL --args="intel_iommu=on"Note
grubby --remove-argsargument can be used to remove any arguments that are not required.Non-grubby Instructions:
sudo sed -i 's/^\(GRUB_CMDLINE_LINUX_DEFAULT="[^"]*\)/\1 intel_iommu=on/' /etc/default/grub
sudo update-grub
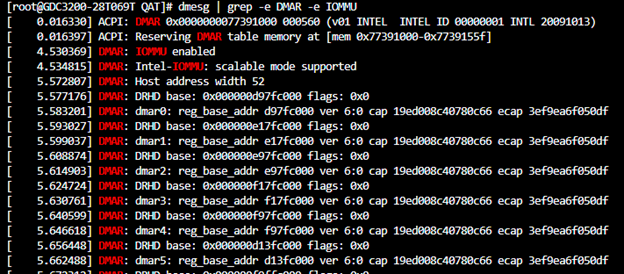
Once the system is restarted, check the DMAR and IOMMU messages using the following command:
sudo dmesg | grep -e DMAR -e IOMMUYou should see a similar output as below:
Kernel Requirements
SR-IOV |
|---|
No special limitations. Any kernel version which is supported by Intel QAT 2.0 can be used. |
Kernel Boot Parameters
SR-IOV |
|---|
|
Install Virtualization Packages
Setup Virtualization:
RHEL/CentOS/Fedora
Update the package list:
sudo dnf update
Install virtualization-related packages using the following command:
sudo dnf -y install qemu-kvm libvirt
Debian/Ubuntu
Update the package list:
sudo apt update
Install virtualization-related packages:
sudo apt install -y qemu-kvm libvirt-daemon-system libvirt-clients bridge-utils
Common Steps
The following steps are common for both RHEL/CentOS/Fedora and Debian/Ubuntu:
Add your user to the libvirt and kvm groups:
sudo usermod -aG libvirt $(whoami)
sudo usermod -aG kvm $(whoami)
Enable and start the libvirtd service:
sudo systemctl enable libvirtd
sudo systemctl start libvirtd
Verify that the libvirtd service is running:
sudo systemctl status libvirtd
log back in to apply the group changes:
sudo su -l $USER
Verify device capabilities using below command:
for id in 4940 4942 4944 4946; do sudo lspci -vnd 8086:$id; done | grep SR-IOVThe output will look similar to:
# for id in 4940 4942 4944 4946; do sudo lspci -vnd 8086:$id; done | grep SR-IOV
Capabilities: [150] Single Root I/O Virtualization (SR-IOV)
Capabilities: [150] Single Root I/O Virtualization (SR-IOV)
Capabilities: [150] Single Root I/O Virtualization (SR-IOV)
Capabilities: [150] Single Root I/O Virtualization (SR-IOV)
Capabilities: [150] Single Root I/O Virtualization (SR-IOV)
Capabilities: [150] Single Root I/O Virtualization (SR-IOV)
Capabilities: [150] Single Root I/O Virtualization (SR-IOV)
Capabilities: [150] Single Root I/O Virtualization (SR-IOV)
System Environment Preparation Demo
Here is a demonstration of how to configure the system to enable virtualization.