Setting Up Host Platform
Updating the BIOS Settings
Note
The BIOS settings for your system may differ from the following steps.
Enabling the SR-IOV BIOS parameter is not required if you are not using SR-IOV.
Power on the development board. Watch closely for the prompt to enter the BIOS setup. Press F2 when prompted.
Enable the VT-d parameter in BIOS. The option may be available under: Advanced > System Agent (SA) Configuration > VT-d
Enable the SR-IOV parameter in BIOS. The option may be available under: Advanced > System Agent (SA) Configuration > SR-IOV
Press F4 to save and exit. The BIOS changes are saved, and the system will boot.
Configuring the Host Operating System with SR-IOV/IOMMU
Note
CentOS* requires the
intel_iommu=onkernel boot parameter to use SR-IOV and VTd functionality.If not running as root user,
sudowill need to be added to the Linux* instructions below.
Verify SR-IOV hardware capabilities.
(lspci -vnd 8086:4940 || lspci -vnd 8086:4942 || lspci -vnd 8086:4944 || lspci -vnd 8086:4946) | grep SR-IOV
The output will look similar to:
Capabilities: [150] Single Root I/O Virtualization (SR-IOV)
Capabilities: [150] Single Root I/O Virtualization (SR-IOV)
Capabilities: [150] Single Root I/O Virtualization (SR-IOV)
Capabilities: [150] Single Root I/O Virtualization (SR-IOV)
Capabilities: [150] Single Root I/O Virtualization (SR-IOV)
Capabilities: [150] Single Root I/O Virtualization (SR-IOV)
Capabilities: [150] Single Root I/O Virtualization (SR-IOV)
Capabilities: [150] Single Root I/O Virtualization (SR-IOV)
Ensure that the system supports VT extensions.
egrep '^flags.*(vmx|svm)' /proc/cpuinfoNote
If nothing is printed out after executing the above command, then the system does not support VT extensions.
Verify that IOMMU is enabled using the following command:
cat /proc/cmdline | grep intel_iommu=onIf nothing is returned from this command, perform the following command:
sudo grubby --update-kernel=ALL --args="intel_iommu=on"Register the Intel® QAT Virtual Function (VF) IDs.
sudo grubby --update-kernel=ALL --args="vfio-pci.ids=8086:4941"
Note
In the above command, the device ID is 8086:4941. Depending on your system, this ID could also be 8086:4943, 8086:4945, or 8086:4947.Refer to Supported Devices section of QATlib Users Guide for additional details.Restart the system.
sudo shutdown -r nowCheck for DMAR and IOMMU messages once the system is restarted.
dmesg | grep -e DMAR -e IOMMUYou should see an output similar to the following:
[0.000000] ACPI: DMAR 000000007b79c000 00080 (v01 INTEL INTEL ID 00000001 INTL 20091013)
[0.000000] Intel-IOMMU: enabled
[0.064454] dmar: IOMMU 0: reg_base_addr fbffc000 ver 1:0 cap d2078c106f0466 ecap f020df
[0.065560] IOAPIC id 8 under DRHD base 0xfbffc000 IOMMU 0
[0.065919] IOAPIC id 9 under DRHD base 0xfbffc000 IOMMU 0
[2.168898] DMAR: No ATSR found
[2.169358] IOMMU 0 0xfbffc000: using Queued invalidation
[2.169728] IOMMU: Setting RMRR:
[2.170091] IOMMU: Setting identity map for device 0000:00:1d.0 [0x7a23f000 - 0x7a241fff]
[2.170767] IOMMU: Prepare 0-16MiB unity mapping for LPC
[2.171133] IOMMU: Setting identity map for device 0000:00:1f.0 [0x0 - 0xffffff]
Note
If the above command fails, a BIOS update or kernel reconfiguration may be required.
Verify kernel modules.
lsmod | grep vfioAn output similar to the following should be displayed:
vfio_pci 16384 0
vfio_pci_core 61440 1 vfio_pci
vfio_virqfd 16384 1 vfio_pci_core
Enable Intel® QAT Virtual Function (VF) Devices
Note
The below script must be run on every boot.
Enable the VF devices with the following script.
for i in `(lspci -D -d :4940 || lspci-D -d :4942 || lspci-D -d :4944 || lspci-D -d :4946)| awk '{print $1}'`; do echo 16|sudo tee /sys/bus/pci/devices/$i/sriov_numvfs; doneIf the error messages similar to the following are observed:
16
tee: '/sys/bus/pci/devices/0000:e8.00.0/sriov_numfs': No such file or directory'
16
tee: '/sys/bus/pci/devices/0000:ed.00.0/sriov_numfs': No such file or directory'
Check
dmesglogs for potential issues such as missing firmware. In the case of missing firmware, the error message would look like:8.146032] 4xxx probe of 0000:e8:00.0 failed with error -14 8.152241] 4xxx 0000:e8:00.0: Direct firmware load for qat_4xxx_mmp.bin failed with error -2 8.152241] 4xxx 0000:e8:00.0: Failed to load MMP firmware qat_4xxx_mmp.bin 8.152241] 4xxx 0000:e8:00.0: Failed to load acceleration FW
Refer to QATlib User’s Guide for details on updating firmware.
Installing Container Runtime
The container runtime will allow you to start a container running the Intel® QuickAssist Technology (Intel® QAT) Software in it. This guide uses the Docker Container Runtime.
Docker
Docker is an open-source containerization technology for building and containerizing applications.
The Linux* environment must be set up to build and run containers. Certain packages will need to be loaded and configuration files created and/or updated, which can be system specific.
These instructions were tested against the following Linux* distribution: CentOS Stream 8 version.
Note
If not running as root user,
sudowill need to be added to the Linux* instructions below.General installation instructions for other Linux* distributions are available in the Docker documentation: Install Docker Engine.
Installing Docker Engine
Uninstall old Docker versions.
sudo dnf remove docker docker-client docker-client-latest docker-common docker-latest docker-latest-logrotate docker-logrotate docker-selinux docker-engine-selinux docker-engineSetup the DNF utilities repository.
sudo dnf install dnf-utilsInstall Docker.
sudo dnf install docker-ce docker-ce-cli containerd.ioStart Docker.
sudo systemctl start dockerDisplay Docker version.
docker --version
Proxy Settings
If the system needs to connect to the internet through a corporate firewall, proxy settings must be enabled. Contact your network administrator for details on the proxy server.
Note
General proxy setup instructions are available in the Docker documentation: Configure Docker to use a proxy server.
Setup proxy services.
export http_proxy=http://<proxy_server:portnum>
export https_proxy=http://<proxy_server:portnum>
export no_proxy=.example2.com,localhost,127.0.0.1
Create a systemd directory for the docker service.
mkdir -p /etc/systemd/system/docker.service.dNavigate to the docker service directory.
cd /etc/systemd/system/docker.service.dCreate a file named http-proxy.conf.
vi http-proxy.confAdd the required environment variables to the http-proxy.conf file.
[Service]
Environment="HTTP_PROXY=http://<proxy_server:portnum>"
Environment="HTTPS_PROXY=http://<proxy_server:portnum> "
Environment="NO_PROXY=.example2.com,localhost,127.0.0.1,dockerregistry.example.com"
Save the file.
Flush the changes.
sudo systemctl daemon-reloadRestart Docker.
sudo systemctl restart dockerVerify the Docker configuration has been loaded and matches the changes made.
systemctl show --property=Environment docker
Running Docker
If required, login with your DockerID to push and pull images from Docker Hub. If you do not have a Docker ID, create one at https://hub.docker.com
docker loginVerify that the Docker Engine is installed correctly by running the hello-world image. This command downloads a test image and runs it in a container. When the container runs, it prints a message and exits.
docker run hello-world
Container Target Setup
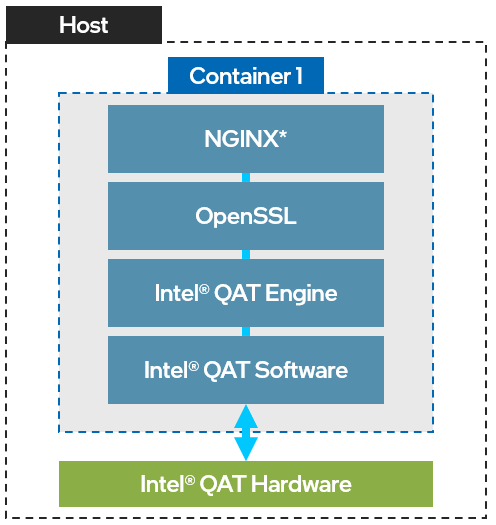
Intel® QuickAssist Technology + NGINX* Setup
The target setup consists of one container running NGINX* (Asynch Mode) with the Intel® QAT Software and the Intel® QuickAssist Technology OpenSSL* Engine (QAT_Engine). This setup will allow you to run an NGINX application with Intel® QuickAssist Technology acceleration.