Choose a project name and click OK. See figure 1
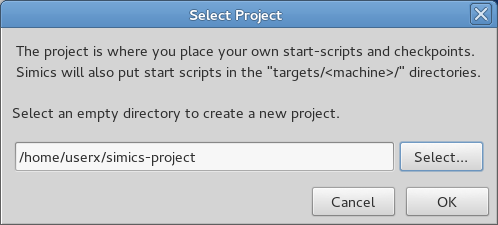
Figure 1. Select Project
Note:
Once a project is created, start Simics from the project directory.
This section describes the deprecated way to install Simics, for users who are not yet using the Intel Simics Package Manager.
Simics is delivered in packages, each one containing different parts of the functionality. There is a base package and several add-on packages. The packages can be combined to create a customized installation. The most common packages are:
The installation process is described in the following chapters. This is a quick overview of the steps involved.
Add-on packages are not installed on top of the main Simics
installation. Instead each package stays in its own directory, and Simics is
simply instructed to look for add-on packages in various places using the
addon-manager program
When installing Simics in a shared environment, several options are provided for multi-user installations. Refer to chapter 5 for a complete description.
As a Simics customer, you should have received instructions that describes which packages you should download and where to find them. If this is not the case, contact your Simics provider to obtain this information.
joe@computer$ cd simics-download
joe@computer$ ls
simics-pkg-1000-6.0.0-linux64.tar
simics-pkg-2096-6.0.0-linux64.tar
The packages are .tar files that can be unpacked with the
tar command. Unpacking the packages will create a
simics-6-install directory with the relevant
installation files:
joe@computer$ tar xf simics-pkg-1000-6.0.0-linux64.tar
joe@computer$ tar xf simics-pkg-2096-6.0.0-linux64.tar
joe@computer$ ls simics-6-install
aescrypt
install_simics_common.pm
install-simics.pl*
package-1000-6.0.0-linux64.packageinfo.aes
package-1000-6.0.0-linux64.tar.gz.aes
package-2096-6.0.0-linux64.packageinfo.aes
package-2096-6.0.0-linux64.tar.gz.aes
installation-guide.pdf
old/package-1000-6.0.0-linux64.packageinfo.aes
old/package-1000-6.0.0-linux64.tar.gz.aes
old/package-2096-6.0.0-linux64.packageinfo.aes
old/package-2096-6.0.0-linux64.tar.gz.aes
The file installation-guide.pdf is a copy of this
manual. The tar.gz.aes files contains the compressed and
encrypted package contents to be installed. The installation script
install-simics.pl is used in the next step of the
installation.
joe@computer$ cd simics-6-install
joe@computer$ ./install-simics.pl
install-simics can install the following packages:
   Number  Name          Type    Version   Host         Package
    1      Simics-Base   simics  6.0.0     linux64      package-1000
    2      QSP-x86    	 addon   6.0.0     linux64      package-2096
    3      All packages

Please enter the numbers of the packages you want to install, as in "1 4 3"
Package numbers, or Enter to [Abort]: 3
/opt/simics/simics-6. In the example session below,
we will accept the default:
Enter a destination directory for installation, or Enter
for [/opt/simics/simics-6/]: <ENTER>
The directory '/opt/simics/simics-6/' does not exist.
Do you want to create it? (y, n) [y]: <ENTER>
The following packages will be installed in /opt/simics/simics-6/:
   Simics-Base 6.0.0 (package-1000-6.0.0-linux64.tar.gz.aes)
   QSP-x86 6.0.0 (package-2096-6.0.0-linux64.tar.gz.aes)

Do you wish to perform the installation? (y, n) [y]: <ENTER>
-> Decrypting package-1000-6.0.0-linux64.tar.gz.aes
-> Testing package-1000-6.0.0-linux64.tar.gz
-> Installing package-1000-6.0.0-linux64.tar.gz
-> Decrypting package-2096-6.0.0-linux64.tar.gz.aes
-> Testing package-2096-6.0.0-linux64.tar.gz
-> Installing package-2096-6.0.0-linux64.tar.gz
If everything was successful, you now have two directories in
/opt/simics/simics-6/
called simics-6.0.0 and
simics-QSP-x86-6.0.0.
/opt/simics/simics-6/simics-6.0.0
directory in the example above is the directory referred to by
the
install-simics has installed the following add-on packages:
   QSP-x86  6.0.0  /opt/simics/simics-6/simics-QSP-x86-6.0.0

Do you wish to make these add-on packages available in
Simics-Base 6.0.0? (y, n) [y]: <ENTER>
-> Making add-on packages available in Simics-Base 6.0.0
Summary of installation process:
   All selected packages were installed successfully

You may now want to see the 'Getting Started' guide.
You may be redirected onto the "old" installation flow if you did not pass the authentication phase. Note, that this option is temporal and will become obsolete soon.
-> Looking for Simics packages in current directory...
Enter a decryption key for package-1000-6.0.0-linux64.tar.gz.aes,
or Enter to [Abort]: 0123456789ABCDEF0123456789ABCDEF
Enter a decryption key for package-2096-6.0.0-linux64.tar.gz.aes,
or Enter to [Abort]: 0123456789ABCDEF0123456789ABCDEF
install-simics can install the following packages:
   Number  Name          Type    Version   Host         Package
    1      Simics-Base   simics  6.0.0     linux64      package-1000
    2      QSP-x86    	 addon   6.0.0     linux64      package-2096
    3      All packages

Please enter the numbers of the packages you want to install, as in "1 4 3"
Package numbers, or Enter to [Abort]: 3
/opt/simics/simics-6. In the example session below,
we will accept the default:
Enter a destination directory for installation, or Enter
for [/opt/simics/simics-6/]: <ENTER>
The directory '/opt/simics/simics-6/' does not exist.
Do you want to create it? (y, n) [y]: <ENTER>
The following packages will be installed in /opt/simics/simics-6/:
   Simics-Base 6.0.0 (package-1000-6.0.0-linux64.tar.gz.aes)
                with key 0123456789ABCDEF0123456789ABCDEF
   QSP-x86 6.0.0 (package-2096-6.0.0-linux64.tar.gz.aes)
                with key 0123456789ABCDEF0123456789ABCDEF

Do you wish to perform the installation? (y, n) [y]: <ENTER>
-> Decrypting package-1000-6.0.0-linux64.tar.gz.aes
-> Testing package-1000-6.0.0-linux64.tar.gz
-> Installing package-1000-6.0.0-linux64.tar.gz
-> Installed source code for Simics-Base
-> Decrypting package-2096-6.0.0-linux64.tar.gz.aes
-> Testing package-2096-6.0.0-linux64.tar.gz
-> Installing package-2096-6.0.0-linux64.tar.gz
-> Installed source code for QSP-x86
If everything was successful, you now have two directories in
/opt/simics/simics-6/
called simics-6.0.0 and
simics-QSP-x86-6.0.0.
/opt/simics/simics-6/simics-6.0.0
directory in the example above is the directory referred to by
the
install-simics has installed the following add-on packages:
   QSP-x86  6.0.0  /opt/simics/simics-6/simics-QSP-x86-6.0.0

Do you wish to make these add-on packages available in
Simics-Base 6.0.0? (y, n) [y]: <ENTER>
-> Making add-on packages available in Simics-Base 6.0.0
Summary of installation process:
   All selected packages were installed successfully

You may now want to see the 'Getting Started' guide.
To get started, run the Simics GUI and set up a project.
If you are new to Simics, you will find more information if you open
the Getting Started document and follow the tutorial. You
will find it in the doc/ directory of your Simics
installation or in the Simics on-line help.
joe@computer$ /opt/simics/simics-6/simics-6.0.0/bin/simics-gui
The first time you run Simics you will be prompted for a project. For more details regarding projects, see the document Getting Started.
If this is not the first time you install Simics Base you are provided with the option to copy the configuration of an earlier Simics installation.
install-simics can re-use the existing configuration
of the following Simics installation:
   Number  Name         Version  Path
    1      Simics-Base  6.0.0    /opt/simics/simics-6/simics-6.0.0
    2      None

Please choose an option [default to 1]: ENTER
You can install more packages at any time using the same steps as in
chapter 3.1.1. It is easiest to install all
packages in the same directory
e.g. /opt/simics/simics-6.
The installer will propose a default configuration that should always work with the latest installed version of Simics. For customized configurations, please read the Add-on Manager, chapter 5.
Uninstalling Simics is very simple, just remove the directories that were created for each package during the installation. Note the following:
project-setup program will
however suggest that you update projects that were using that add-on
package.project-setup
program from another Simics installation.
VMP uses direct execution to simulate x86 systems at near native speed. Kernel modules are needed to communicate directly with the host hardware, and installing those kernel modules requires a separate step.
Installing and managing VMP kernel modules requires sudo
privileges. Installing will compile the kernel module and therefore
also requires an environment to build kernel modules. Which packages
you need for building kernel modules depend on the distribution of
Linux that you are using, but at least for certain Red Hat based
distributions you would
need gcc-c++, kernel-headers,
and kernel-devel. Change directory to the Simics Base package
and run:
joe@computer$ bin/vmp-kernel-install
The script will compile and persistently install the kernel modules
that are used by VMP. It will echo what needs to be done, which
involves running scripts in the vmxmon/scripts/
directory.
Disable VMP temporarily by running
the bin/vmp-kernel-unload script, and enable VMP with
the bin/vmp-kernel-load script. Permanently uninstall VMP
from your host by running the bin/vmp-kernel-uninstall
script.
If your installation is read-only, or you for some other reason want to have the built VMP artifacts outside of the installation, you can give a directory to the relevant VMP scripts, example:
joe@computer$ bin/vmp-kernel-install /somewhere/directory
joe@computer$ bin/vmp-kernel-load /somewhere/directory
See the VMP section in the Simulation Performance chapter of the Simics User's Guide for information about enabling and using VMP.
Simics is delivered in packages, each one containing different parts of the functionality. There is a base package and several add-on packages. The packages can be combined to create a customized installation. The most common packages are:
The installation process is described in the following chapters. This is a quick overview of the steps involved.
Add-on packages are not installed on top of the main Simics
installation. Instead each package stays in its own directory, and Simics is
simply instructed to look for add-on packages in various places using the
addon-manager program
When installing Simics in a shared environment, several options are provided for multi-user installations. Refer to chapter 5 for a complete description.
As a Simics customer, you should have received instructions that describes which packages you should download and where to find them. If this is not the case, contact your Simics provider to obtain this information.
.exe installers.C:\Program Files\Simics\Simics 6\.
To get started, run the Simics Classic UI and set up a project.
If you are new to Simics, you will find more information if you open the Getting Started document and follow the tutorial. You will find it under the Start Menu in your Simics installation or in the Simics on-line help.
If this is not the first time you install Simics Base you are provided with the option to copy the configuration of an earlier Simics installation.
You can install more packages at any time using the same steps as in
chapter 3.1.1. It is easiest to install all
packages in the same directory
e.g. /opt/simics/simics-6.
The installer will propose a default configuration that should always work with the latest installed version of Simics. For customized configurations, please read the Add-on Manager, chapter 5.
To uninstall Simics or its add-on packages, navigate to Start
Menu → Control Panel → Programs and Features, select
and right-click an entry and select Uninstall. Another option is to run
the downloaded installation .exe file and eventually
select Remove.
Note the following:
project-setup program will
however suggest that you update projects that were using that add-on
package.project-setup
program from another Simics installation.
VMP uses direct execution to simulate x86 systems at near native speed. Kernel modules are needed to communicate directly with the host hardware, and installing those kernel modules requires a separate step.
The kernel module can be loaded and unloaded by running
the bin\vmp-kernel-load.bat
respective bin\vmp-kernel-unload.bat scripts as
administrator. To do that, open a command shell as administrator and run:
bin\vmp-kernel-load.bat
Another way to perform the same action would be to right-click on
vmp-kernel-load.bat and select run as administrator.
The /AUTO and /DEMAND options select the start option for the VMP service. With /AUTO (default), the service will be available after restart whereas with /DEMAND (which used to be the behavior before these flags were added) will mean that the service is only available until shutdown or reboot and then has to be manually loaded again if needed.
If the script fails, see the Windows event log for more information. The most common reason is that Intel® VT-x technology or the NX feature is not enabled in the BIOS. The kernel module will also fail to load if Windows is running with the Hyper-V feature enabled.
See the VMP section in the Simulation Performance chapter of the Simics User's Guide for information about enabling and using VMP.