This workload tuning guide describes the best known practices to optimize performance on Intel Xeon CPUs when running Apache Cassandra. Default configurations may vary across hardware vendors, thus this guide helps provide a set of recommended settings for getting the best performance throughput/latency.
This document is organized with the following topics:
- Document Nomenclature
- Hardware Configuration Recommendations
- BIOS Setting Recommendations
- DataStax’s Kernel/Storage/Network Settings
- Cassandra Settings
- Cassandra-Stress Testing
- Cassandra-Stress Performance Comparisons
- Example System Startup Script
- FAQ
Document Nomenclature
This document uses the following distinctions:
- Client: Applies only to client systems running the load generator like
cassandra-stress, NoSQLBench, or other benchmarks - Server: Applies only to server systems running the Cassandra instances
- Cloud: Where applicable, notes differences between bare-metal and cloud instances
- Cass3: Applies only to Cassandra version 3.x
- Cass4: Applies only to Cassandra version 4.x
- Cass5: Applies only to Cassandra version 5.x
- CassStress: Applies only to the
cassandra-stressbenchmark (not required if using other benchmarks) - PerfTip X%: Estimated performance throughput improvement expected with this change
Hardware Configuration Recommendations
Typical Cassandra Configuration:
| Client system | < —- | Network | —- > | Server System | <———-> | Database |
|---|---|---|---|---|---|---|
| (Load generator) | Cassandra Instance(s) | Data Location (Storage) |
The Apache Cassandra Database or Cassandra instance(s) run on the server system.
There are minimum hardware requirements for a Cassandra instance.
The details can be found here
In summary, the minimum CPU/DRAM hardware required for a small production Cassandra instance is 8 logical CPU and at least 32GB of DRAM.
For a larger Cassandra instance, we have found there is an upper limit where Cassandra performance does not scale linearly any more by adding more CPU/Memory resources.
This limit is approximately 48 logical CPU cores per Cassandra instance.
To avoid this inefficiency, customers typically run multiple Cassandra instances on larger hardware systems to provide the best Cassandra performance on these larger systems.
Below are some typical hardware sizing recommendations.
Note, your specific schema, request types, replication and other performance requirements may differ and may need to alter these recommendations.
Table 1: Summary of Hardware Resources for One Cassandra Instance
| System Size | Number Logical CPUs | Memory | Storage | Networking |
|---|---|---|---|---|
| Small | 8 | 32 GB | 1 SATA/SAS SSD | 10 Gbit |
| Medium | 16 | 64 GB | 2 SATA/SAS SSD or 1 NVME | 10 Gbit |
| Large | 32 | 128 GB | 1 NVME | 10-25 Gbit |
| X-Large | 48 | 192 GB | 1-2 NVME | 25 Gbit |
BIOS Configuration Recommendations
Table 2 describes the BIOS options that impact Cassandra performance.
Table 2: Summary of BIOS Options for Optimizing Cassandra
| Parameter Name | Typical BIOS Default | BIOS Setting Recommended | Description | PerfTip |
|---|---|---|---|---|
| Hyperthreading/SMT | Enabled | Enabled | Enabling hyperthreading or simultaneous multithreading allows for two hardware threads per core on supported Xeon CPUs. Note, Xeons E core CPUs do not support this feature. | up to 22% |
| SNC | Disabled or SNC1 | Enabled, SNC 2-4 depending on number of Cassandra instances running | When running more than 1 Cassandra instance, enabling Sub-Numa-Clustering gives you a way to isolate compute/memory resources to improve Cassandra running efficiency. See “NUMA Performance Considerations” in this document for more details. | in combination with numactl changes, up to 15% |
| Latency Optimized Mode | Disabled | Enabled | Some Xeon system BIOS expose this parameter. This setting optimizes for latency vs. power of the memory subsystem, which helps latency-sensitive workloads, like Cassandra. | 2–4% |
DataStax’s Kernel/Storage/Network Settings
- For the Linux OS kernel, we follow the kernel settings and disable kernel features settings that impact performance specified in the DataStax Link.
- For storage, we follow the “Optimize disk settings” and “Optimize SSDs” recommendations.
If your schema and access requests are small (~1KB), random, and mostly read requests on flash media, changing the defaultread_ahead_kbfrom 128 to 8 can double throughput.!Performance tip: can give you up to 100% speedup
- For networking, we follow the “Networking TCP settings” in the DataStax link.
All these settings (kernel, storage, and networking) are captured in the “Example System Startup Script” towards the end of this document.
Adding Multiple Network IP Addresses to a Network Interface
Each Cassandra instance requires a unique IP address.
If you plan to support multiple Cassandra instances on one system with one network interface, you can add static network IP addresses to an existing one:
# Network Alias (one IP address per instance)
ifconfig eth0:0 <new ip addr for Cassandra1> up
ifconfig eth0:1 <new ip addr for Cassandra2> up
...
ifconfig eth0:n <new ip addr for CassandraN> up
Cassandra settings
Cassandra Directories and Files of Interest:
Server side will have the entire Cassandra directory and files below. If multiple Cassandra instances are running on the same server, there will be one CASSANDRA_SERVER_HOME# directory for each Cassandra instance. Below are the files of interest that we either run or modify:
<CASSANDRA_SERVER_HOME#>
|
|__bin
| |__cassandra (Cassandra startup script)
| |__nodetool (run to get status and compaction info)
|
|__ conf
| |__cassandra.yaml # (tuning parameters for Cass3/4/5)
| |__cassandra_latest.yaml (new Cass5 features)
| |__cassandra-env.sh (JMX_PORT setting for multiple instance)
| |__jvm.options (Cass3 all java settings)
| |__jvm-server.options (Cass4/5 java general settings)
| |__jvm8-server.options (Cass4 java 8 specific settings)
| |__jvm11-server.options (Cass4/5 java 11 specific settings)
| |__jvm17-server.options (Cass5 java 17 specific settings)
| |__jvm21-server.options (Cass5 java 21 specific settings)
|
|__tools
| |__cqlstress-insanity-example.yaml (CassStress schema files)
| |
| |__bin
| |__cassandra-stress (CassStress load generator)
…
Modification to General settings on the Server Side:
JAVA_HOMEmust be set before launching Cassandra. These 2 lines are required for the Java library you are using:
export JAVA_HOME=<Path_to_Java_installation_folder>

# For example, with OpenJDK version 17, this would be:
export JAVA_HOME=/usr/lib/jvm/java-17-openjdk-amd64
export PATH=$JAVA_HOME/bin:$PATH
Modification to the Cassandra YAML Configuration File on Server Side:
Most Cassandra parameters/features and settings are in this file: <CASSANDRA_SERVER_HOME#>/conf/cassandra.yaml. All Cassandra versions require the following parameter modifications:
- seeds: <your server’s IP>
- listen_address: <your server’s IP>
- rpc_address: <your server’s IP>
- data_file_directories: (example /mnt/nvme1/cass_db)
- commitlog_directory: (example /mnt//nvme1/cass_db/commitlog)
- cdc_raw_directory: (example /mnt/nvme1/cass_db/cdc_raw)
- saved_caches_directory: (example /mnt/nvme1/cass_db/saved_caches)
- concurrent_reads: <#number of threads for reads>, optimal values of this is 3X the number
of logical CPUs allocated for this Cassandra instance.
!Performance tip: can give you up to 15% speedup
- concurrent_writes: there are negative effects in increasing this value beyond the number of CPU (virtual CPU number). The root cause comes from a known contention software issue, a workaround to this problem, use the same value as logical CPU for this instance.
Cass5, new to this Cassandra version, there are two cassandra*.yaml files included cassandra.yaml and cassandra_latest.yaml.
- The cassandra.yaml file is backward compatible with Cass4 data format and settings, thus if you already have a database created with Cass4 you can use this file.
- The cassandra_latest.yaml file has multiple new features added on Cass5 like Unified Compaction, Trie Memtable and BTI SStables. To use all these features, the datasets creation must be done with these features enabled. To use this yaml file with Cass5, the file cassandra_latest.yaml must be renamed to cassandra.yaml before initiating Cassandra.
There is a performance benefit by using all the new features in Cass5, over not using these features.
!Performance tip: can give you up to 27% speedup
Modification of Java Files
Apply the following to <CASSANDRA_SERVER_HOME#>/conf/jvm* file changes according to the Java version supported.
We recommend using the latest JDK supported by the Cassandra version you are using, as this can improve throughput with JDK change alone.
- Cass3 only supports JDK version 8
- Cass4 supports JDK versions 8 through 11
- Cass5 supports JDK versions 11 through 17
- Future Cassandra version 5.1 is planned to support JDK version 21
Reference
Add the following changes:
jvm-server.options
!Performance tip: can give you 3-5% of speedup
# Throughput advantage when using 2MB vs. the default 4KB memory pages (less compute overhead).
# We also use TransparentHugePage to not have to guess on memory allocation sizes upfront
-XX:+UseLargePages
-XX:+UseTransparentHugePages
**jvm
!Performance tip: can give you up to 10% speedup ```bash
comment out NUMA
-XX:+UseNUMA
In Cass3 and Cass4 CMS was the default garbage collector,
using G1GC gives up to throughput improvement and lower
latency vs. CMS, below we are commenting out the CMS garbage
collector
CMS Settings
#-XX:+UseParNewGC #-XX:+UseConcMarkSweepGC #-XX:+CMSParallelRemarkEnabled #-XX:SurvivorRatio=8 #-XX:MaxTenuringThreshold=1 #-XX:CMSInitiatingOccupancyFraction=75 #-XX:+UseCMSInitiatingOccupancyOnly #-XX:CMSWaitDuration=10000 #-XX:+CMSParallelInitialMarkEnabled #-XX:+CMSEdenChunksRecordAlways #-XX:+CMSClassUnloadingEnabled
Cass3 and Cass4 requires to explicitly enable G1GC
Cass5 G1GC is the default
-XX:+UseG1GC #
This is the Cassandra instance heap size
NOTE: the total number of CassandraInstances*HeapSize
should take between 25-50% of total system memory, we have
not seen any performance benefits when setting this higher than
64GB heaps with G1GC
#
PERFORMANCE NOTE: avoid using heaps between 32GB-38GB, details
explained here:
https://blog.codecentric.de/35gb-heap-less-32gb-java-jvm-memory-oddities
# -Xms31G -Xmx31G
## Modification to the Cassandra-env file on the Server Side:
No modifications are needed to this file if running only one Cassandra instance on the server system or
running Cassandra with a hypervisor. Modifications are required when running more than one Cassandra
instance on bare metal, each Cassandra instance must have a unique JMX_PORT number, hence the
following file should be modified: `<CASSANDRA_SERVER_HOME#>/conf/cassandra-env.sh`:
```bash
JMX_PORT=”7199” # 7199 for instance 1,
JMX_PORT=”7299” # 7299 for instance 2, etc.
…
Performance Option:
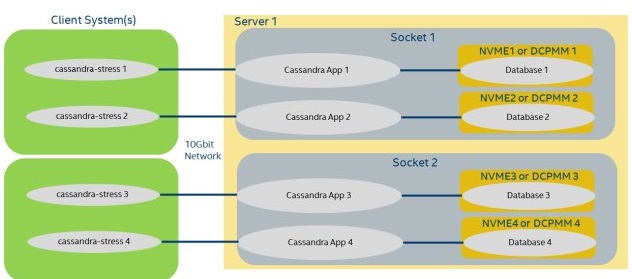
As previously stated in suggest hardware, one Cassandra instance scales well till around 48 logical CPUs, hence for large system with >48 CPU and/or multiple CPU sockets, multiple Cassandra instances are recommended to use compute and memory resources efficiently. Example below shows Configuration Diagram 1 with a dual socket and 128 logical CPUs. In this case each Cassandra Instance will take 32 CPUs and its own NVME device.
NUMA Performance Considerations:
!Performance tip: can give you up to 15% speedup
Each Cassandra instance above can be pinned to distinct CPU and/or NUMA memory region for best performance. For example, in Configuration Diagram 1, if the system supports Sub NUMA clustering 2, or 4 NUMA nodes total for the system, each Cassandra instance can be pinned to its own compute and memory with the numactl command. Below are the changes to the cassandra startup script for each Cassandra instance, highlighted are the changes:
<CASS_HOME_INST0>/bin/cassandra file compute/memory bind NUMA 0:
…
NUMACTL_ARGS=”” #${NUMACTL_ARGS:-"--interleave=all"}
if which numactl >/dev/null 2>/dev/null && numactl $NUMACTL_ARGS ls / >/dev/null
2>/dev/null
then
 NUMACTL="numactl -m 0 -N 0 $NUMACTL_ARGS"
else
 NUMACTL=""
fi

<CASS_HOME_INST1>/bin/cassandra file compute/memory bind NUMA 1:
…
NUMACTL_ARGS==”” #${NUMACTL_ARGS:-"--interleave=all"}
if which numactl >/dev/null 2>/dev/null && numactl $NUMACTL_ARGS ls / >/dev/null
2>/dev/null
then
 NUMACTL="numactl -m 1 -N 1 $NUMACTL_ARGS"
else
 NUMACTL=""
fi

<CASS_HOME_INST2>/bin/cassandra file compute/memory bind NUMA 2:
…
NUMACTL_ARGS==”” #${NUMACTL_ARGS:-"--interleave=all"}
if which numactl >/dev/null 2>/dev/null && numactl $NUMACTL_ARGS ls / >/dev/null
2>/dev/null
then
 NUMACTL="numactl -m 2 -N 2 $NUMACTL_ARGS"
else
 NUMACTL=""
fi

<CASS_HOME_INST3>/bin/cassandra file compute/memory bind NUMA 3:
…
NUMACTL_ARGS==”” #${NUMACTL_ARGS:-"--interleave=all"}
if which numactl >/dev/null 2>/dev/null && numactl $NUMACTL_ARGS ls / >/dev/null
2>/dev/null
then
 NUMACTL="numactl -m 3 -N 3 $NUMACTL_ARGS"
else
 NUMACTL=""
fi
To find the specific NUMA details of your system run the following command, you may need to change the number of nodes supported in the system BIOS settings.
numactl -H
Cloud: Cloud providers typically do not let you modify NUMA and may only have one node for the entire system hence this NUMA section can be skipped for the cloud.
Starting a Cassandra Instance on the Server Side:
<CASSANDRA_SERVER_HOME#>/bin/cassandra -R
Stopping the Cassandra Instance “gracefully” on the Server Side:
<CASSANDRA_SERVER_HOME#>/bin/nodetool flush
<CASSANDRA_SERVER_HOME#>/bin/nodetool drain
<CASSANDRA_SERVER_HOME#>/bin/nodetool stopdaemon
Forcefully Stopping the Cassandra Instance on the Server Side:
killall –9 <pid for cassandra>
Forcefully stop all the Cassandra Instances:
killall –9 java
Cassandra-Stress Testing
Modification to Cassandra Schema File on the Client Side (CassStress):
Cassandra comes with multiple example data layout format files, i.e. schema files. The file that best
represents our customer’s data is typically the insanity schema. This file can be found in
<CASSANDRA_CLIENT_HOME>/tools/cql-insanity-example.yaml. The following modifications are applied to
this file for the best mixed workload performance on Cassandra-Stress.
The compaction parameter is changed on the schema from default ‘LeveledCompactionStrategy’ to ‘SizeTieredCompactionStrategy’ for best overall performance on a mix 80:20 Read:Write workload. Note, the line with compression definition does not appear by default on the cql-insanity-example.yaml file, it is here to explicitly show the settings for each Cassandra version. Cass3, change the compaction strategy to SizeTieredCompactionStrategy
…
) WITH compaction = {'class':'SizeTieredCompactionStrategy'}
AND compression = {'class':'LZ4Compressor','chunk_length_in_kb':64}
# defaults on Cass3
AND comment='A table of many types to test wide rows and collections'
Cass4, change compaction strategy to SizeTieredCompactionStrategy, note that the compressor default is different than Cass3, as the default changed to 16KB chunk size.
…
) WITH compaction = {'class':'SizeTieredCompactionStrategy'}
AND compression = {'class':'LZ4Compressor','chunk_length_in_kb':16}
# default on Cass4
AND comment='A table of many types to test wide rows and collections'
Cass5, change compaction strategy to the new unifiedCompactionStrategy which adjusts automatically between Leveled and SizeTiered for best overall performance.
…
) WITH compaction = { 'class':'unifiedCompactionStrategy' }
AND compression = { 'class':'LZ4Compressor','chunk_length_in_kb':16}
# default on Cass5
AND comment='A table of many types to test wide rows and collections'
Cassandra-stress initial table creation (CassStress)
Cassandra requires a dataset on the server to read and write commands and test for performance, hence building or copying a dataset is a required step before any performance testing: To build your own dataset on one Cassandra instance:
<CASS_HOME>/tools/bin/cassandra-stress \
          user profile=<CASS_HOME>/tools/cql-insanity-example.yaml \
          ops\(insert=1\) no-warmup \
          cl=ONE \
          n=<number of entries in the DB> \
          -mode native cql3 \
          –pop seq=1..<number of entries in DB> \
          -node <your server’s IP> \
          -rate threads=<load>
user profile Designate the schema YAML file to use with cassandra-stress.
no-warmup Do not warmup the instance, do a cold start.
cl=ONE – consistency level. A write must be written to the commit log and MemTable of at least one replica
node. This is for one node cluster case. If multiple nodes are used in a cluster for example you can make
multiple copies of the data.
n= number of entries in database, typically 670 Bytes per entry
**pop seq=1..
Additional tips to have a successful database created. To avoid missing key-value entries while creating database, do the following:
- Temporarily set the write timeout to 8 seconds:
<CASS_HOME>/bin/nodetool setwriterequesttimeout 8000 - Temporarily set concurrent compactors to 8 to accelerate the compaction activity:
<CASS_HOME>/bin/nodetool setconcurrentcompactors 8 - Temporarily increase the compaction throughput to an NVME devices to 128 MB/sec:
<CASS_HOME>/bin/nodetool setcompactionthroughput 128
After the initial table has been created, flush and monitor until all compaction is done before stopping the Cassandra instance:
- Flush Cassandra memory buffers to disk:
<CASS_HOME>/bin/nodetool flush - Wait until all compaction jobs are done:
watch <CASS_HOME>/bin/nodetool compactionstats - Once compaction is done (may take hours for large datasets), we want to safely drain and turn off Cassandra: ```bash