Intel FPGA device plugin for Kubernetes
Table of Contents
Introduction
This FPGA device plugin is part of a collection of Kubernetes components found within this repository that enable integration of Intel FPGA hardware into Kubernetes.
The following hardware platforms are supported:
Intel Arria 10
Intel Stratix 10
The components support the Open Programmable Acceleration Engine (OPAE) interface.
The components together implement the following features:
discovery of pre-programmed accelerator functions
discovery of programmable regions
orchestration of FPGA programming
access control for FPGA hardware
Component Overview
The following components are part of this repository, and work together to support Intel FPGAs under Kubernetes:
FPGA device plugin (this component)
A Kubernetes device plugin that discovers available FPGA resources on a node and advertises them to the Kubernetes control plane via the node kubelet.
FPGA admission controller webhook
A Kubernetes admission controller webhook which can be used to dynamically convert logical resource names in pod specifications into actual FPGA resource names, as advertised by the device plugin.
The webhook can also set environment variables to instruct the OCI createRuntime hook to program the FPGA before launching the container.
NOTE: Installation of the FPGA admission controller webhook can be skipped if the FPGA device plugin is operated with the Intel Device Plugins Operator since it integrates the controller’s functionality. However, the mappings still must be deployed.”
-
An OCI createRuntime hook that, upon instruction from the FPGA admission controller, programs the FPGA before the container is launched. The FPGA plugin uses Container Device Interface to pass the hook to the Kubelet.
The repository also contains an FPGA helper tool that may be useful during development, initial deployment and debugging.
Modes and Configuration Options
The FPGA plugin set can run in one of two modes:
regionmode, where the plugins locate and advertise regions of the FPGA, and facilitate programing of those regions with the requested bistreams.afmode, where the FPGA bitstreams are already loaded onto the FPGA, and the plugins discover and advertises the existing Accelerator Functions (AF).
The example YAML deployments described in this document only currently support
af mode. To utilise region mode, either modify the existing YAML appropriately,
or deploy ‘by hand’.
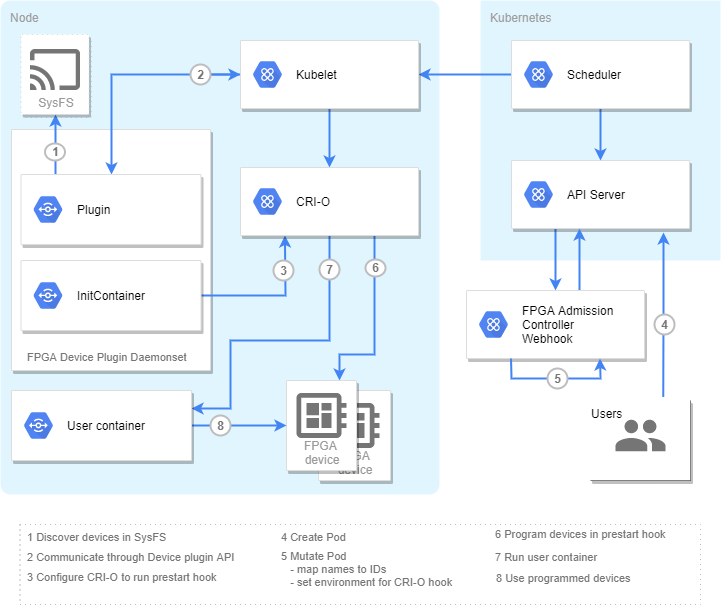
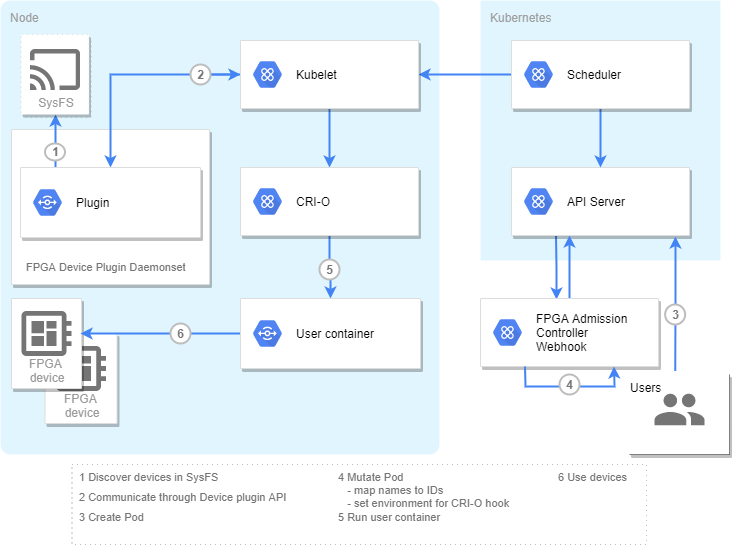
Overview diagrams of af and region modes are below:
region mode:

af mode:

Installation
The below sections cover how to use this component.
Prerequisites
All components have the same basic dependencies as the generic plugin framework dependencies
To obtain a fully operational FPGA enabled cluster, you must install all three major components:
The CDI hook is only required if region mode is being used, but is installed by default by the
FPGA plugin DaemonSet YAML, and is benign
in af mode.
If using the af mode, and therefore not using the OCI createRuntime hook, any runtime can be used
(that is, the CDI is not supported by all runtimes).
The FPGA device plugin requires a Linux Kernel FPGA driver to be installed and enabled to operate. The plugin supports the use of either of following two drivers, and auto detects which is present and thus to use:
Install this component (FPGA device plugin) first, and then follow the links and instructions to install the other components.
The FPGA webhook deployment depends on having cert-manager installed. See its installation instructions here.
$ kubectl get pods -n cert-manager
NAME                                      READY   STATUS    RESTARTS   AGE
cert-manager-7747db9d88-bd2nl             1/1     Running   0          1m
cert-manager-cainjector-87c85c6ff-59sb5   1/1     Running   0          1m
cert-manager-webhook-64dc9fff44-29cfc     1/1     Running   0          1m
Pre-built Images
Pre-built images of the components are available on the Docker hub.
These images are automatically built and uploaded to the hub from the latest main branch of
this repository.
Release tagged images of the components are also available on the Docker hub, tagged with their
release version numbers (of the form x.y.z, matching the branch/tag release number in this repo).
The following images are available on the Docker hub:
Depending on the FPGA mode, run either
$ kubectl apply -k 'https://github.com/intel/intel-device-plugins-for-kubernetes/deployments/fpga_plugin/overlays/af?ref=<RELEASE_VERSION>'
namespace/intelfpgaplugin-system created
customresourcedefinition.apiextensions.k8s.io/acceleratorfunctions.fpga.intel.com created
customresourcedefinition.apiextensions.k8s.io/fpgaregions.fpga.intel.com created
mutatingwebhookconfiguration.admissionregistration.k8s.io/intelfpgaplugin-mutating-webhook-configuration created
clusterrole.rbac.authorization.k8s.io/intelfpgaplugin-manager-role created
clusterrole.rbac.authorization.k8s.io/intelfpgaplugin-node-getter created
clusterrolebinding.rbac.authorization.k8s.io/intelfpgaplugin-get-nodes created
clusterrolebinding.rbac.authorization.k8s.io/intelfpgaplugin-manager-rolebinding created
service/intelfpgaplugin-webhook-service created
deployment.apps/intelfpgaplugin-webhook created
daemonset.apps/intelfpgaplugin-fpgadeviceplugin created
certificate.cert-manager.io/intelfpgaplugin-serving-cert created
issuer.cert-manager.io/intelfpgaplugin-selfsigned-issuer created
or
$ kubectl apply -k 'https://github.com/intel/intel-device-plugins-for-kubernetes/deployments/fpga_plugin/overlays/region?ref=<RELEASE_VERSION>'
namespace/intelfpgaplugin-system created
customresourcedefinition.apiextensions.k8s.io/acceleratorfunctions.fpga.intel.com created
customresourcedefinition.apiextensions.k8s.io/fpgaregions.fpga.intel.com created
mutatingwebhookconfiguration.admissionregistration.k8s.io/intelfpgaplugin-mutating-webhook-configuration created
clusterrole.rbac.authorization.k8s.io/intelfpgaplugin-manager-role created
clusterrole.rbac.authorization.k8s.io/intelfpgaplugin-node-getter created
clusterrolebinding.rbac.authorization.k8s.io/intelfpgaplugin-get-nodes created
clusterrolebinding.rbac.authorization.k8s.io/intelfpgaplugin-manager-rolebinding created
service/intelfpgaplugin-webhook-service created
deployment.apps/intelfpgaplugin-webhook created
daemonset.apps/intelfpgaplugin-fpgadeviceplugin created
certificate.cert-manager.io/intelfpgaplugin-serving-cert created
issuer.cert-manager.io/intelfpgaplugin-selfsigned-issuer created
Where <RELEASE_VERSION> needs to be substituted with the desired release tag or main to get devel images.
The command should result in two pods running:
$ kubectl get pods -n intelfpgaplugin-system
NAME                                       READY   STATUS    RESTARTS   AGE
intelfpgaplugin-fpgadeviceplugin-skcw5     1/1     Running   0          57s
intelfpgaplugin-webhook-7d6bcb8b57-k52b9   1/1     Running   0          57s
If you need the FPGA plugin on some nodes to operate in a different mode then add this annotation to the nodes:
$ kubectl annotate node <node_name> 'fpga.intel.com/device-plugin-mode=region'
or
$ kubectl annotate node <node_name> 'fpga.intel.com/device-plugin-mode=af'
And restart the pods on the nodes.
Note: The FPGA plugin DaemonSet YAML also deploys the FPGA OCI createRuntime hook
initcontainerimage, but it will be benign (un-used) when running the FPGA plugin inafmode.
Verify Plugin Registration
Verify the FPGA plugin has been deployed on the nodes. The below shows the output
you can expect in region mode, but similar output should be expected for af
mode:
$ kubectl describe nodes | grep fpga.intel.com
fpga.intel.com/region-ce48969398f05f33946d560708be108a:  1
fpga.intel.com/region-ce48969398f05f33946d560708be108a:  1
Note: The FPGA plugin DaemonSet YAML also deploys the FPGA OCI createRuntime hook
initcontainerimage as well. You may also wish to build that image locally before deploying the FPGA plugin to avoid deploying the Docker hub default image.